This site is supported by our readers. We may earn a commission, at no cost to you, if you purchase through links.
 Investigate the truth of the theory that mastering hair toner application post-bleaching is the ultimate key to achieving the flawless, desired shade.
Unveil the secrets of correcting brassiness and achieving that elusive platinum or silver hue.
From selecting the right toner to precise application techniques, gain mastery over the post-bleaching process.
Empower yourself with insights on ideal developer matches, effective application methods, and long-term maintenance, ushering in liberation and control over your hair’s brilliance.
Table Of Contents
- Key Takeaways
- Bleaching for Toning
- Checking Bleach Level
- Using Purple Mask
- Applying Hair Toner
- Toner Selection Tips
- Application: Wet or Dry Hair?
- Applying the Toner
- Addressing Dark Parts
- Before & After Toner
- Post-Toning Maintenance
- Frequently Asked Questions (FAQs)
- How does the use of a Purple Mask contribute to the toning process after bleaching?
- Can Blondify toners be mixed with a higher volume developer for stronger results, or is it advisable to stick to the recommended 10 or 20 volume?
- Are there specific considerations or precautions for applying toner to wet or towel-dried hair, and how does this affect the toning results?
- In the context of toning longevity, what factors may influence how long Blondify toners last, and are there any additional tips for extending their effectiveness?
- Is there a recommended waiting period between using specialized treatments like an egg wash for correcting undesired tones and the application of a toner?
- Conclusion
Key Takeaways
- Choose the appropriate bleach based on hair type and desired tone, considering the Bond Protect technology.
- Opt for 20-volume for darker shades and 30-volume for light blonde during bleaching for effective results.
- Employ toning techniques that include diluting toner, focusing on brassier sections, and applying on damp hair for even coverage.
- Ensure longevity and maintenance of toned hair by understanding toner lifespan, adapting toning routines, and addressing undesired tones promptly with specialized treatments.
Bleaching for Toning
Are you wondering how to prepare your hair for toning after bleaching?
The first step is selecting the right bleach for optimal results. Consider factors such as hair type, desired tone, and developer strength. Use a high-quality bleach with Bond Protect technology to minimize damage and irritation.
When it comes to choosing the developer, opt for 20 volume if you have darker shades or 30 volume if your hair is already light blonde.
After bleaching, dilute your toner according to package instructions and apply it evenly on damp hair using an applicator brush.
Leave the toner on for the recommended time before rinsing thoroughly with water followed by a gentle shampoo.
Checking Bleach Level
Once you’ve completed the bleaching process, assessing the achieved level of lightness in your hair is pivotal before proceeding with toning.
- Bleach Assessment:
- Inspect hair for the desired level of lightness.
- Aim for a very pale yellow shade, around level 9 or 10, ensuring full lifting for optimal toning results.
- Color Evaluation:
- Avoid stopping at orange or yellow-orange shades. Complete lifting is crucial for effective toning.
- Hue Analysis:
- Ensure your hair has reached the desired tone before applying toner.
- Assess for any residual brassy or unwanted hues that may need correction.
Assessing the bleach level determines the effectiveness of subsequent toning. Aim for the right lightness to achieve the desired tonal outcome, ensuring a clean canvas for the toner application.
Using Purple Mask
After bleaching, target any lingering yellow tones by employing a purple mask. This technique is key for color correction, leveraging pigment interaction to neutralize unwanted tones while sealing the cuticle.
The purple mask operates on the color wheel principle, countering yellows with its complementary shade. By utilizing this method, you liberate your hair from brassy hues, empowering a more refined, cooler tone.
The mask’s formulation adeptly works to balance and refine your hair’s color spectrum, offering a powerful ally in your post-bleaching journey.
Apply the mask evenly, allowing it to sit for the recommended time to achieve optimal results.
This step, crucial for tonal control, grants you the understanding and power to perfect your hair’s hue post-bleaching.
Applying Hair Toner
To apply hair toner effectively post-bleaching, grab a clean applicator brush and mix your chosen toner with the developer according to the product’s instructions.
Whether you decide to apply the toner on wet or dry hair depends on personal preference and specific circumstances. Applying it on damp hair can help with better penetration and even distribution, while applying it on dry hair may result in more concentrated color effects.
When applying the toner, start from the roots and work your way down to ensure even coverage. Pay extra attention to any areas that appear darker or brassier than others for targeted correction.
Leave the toner on for the recommended amount of time before rinsing thoroughly with water followed by a gentle shampoo designed for post-bleach care.
Toner Selection Tips
When selecting the ideal toner for your post-bleaching hair, precision is paramount.
Ensure an effective toning process by matching the toner to your hair’s current shade, whether it’s dark natural tones, platinum blonde, or a transition from brown to blonde.
Mastering toner selection is the first step towards achieving the lasting and vibrant hair tone you desire.
Ideal Developer Match
Selecting the ideal developer is crucial for achieving the desired toning results on your freshly bleached hair.
Developer strength plays a key role in determining the effectiveness of your toner and its compatibility with different shades.
For darker toners, opt for 10 volume developer, while lighter toners work best with 20 volume developer.
Remember to follow color wheel basics to choose complementary tones and consider timing guidelines provided by the manufacturer for optimal results.
Effective Toner Application
Now that you grasp the ideal developer match, let’s delve into how to ensure effective toner application, guiding you through the process for optimal results on your freshly bleached hair.
Achieve precision application by starting with brassier areas, ensuring even coverage.
Avoid common toner mistakes for quick, impressive results.
Master toning techniques that guarantee vibrant and long-lasting outcomes, giving you the power to perfect your post-bleaching look effortlessly.
**Longevity and Maintenance
As you navigate through the nuances of effective toner application, delve into ensuring the longevity and maintenance of your vibrant post-bleaching results.
- Toner Lifespan: Understand the typical duration, ranging from 2-8 weeks, and plan your re-toning accordingly.
- Seasonal Adjustments: Consider adapting your toning routine based on seasonal changes and environmental factors.
- Toning Troubles: Address undesired tones promptly with specialized treatments.
- Color Revival: Explore monthly hair gloss applications for a revitalized and enhanced tonal experience.
Discover the art of maintaining your radiant tones with these essential insights.
Application: Wet or Dry Hair?
For optimal results, apply the toner on slightly dampened hair, ensuring even coverage and enhanced absorption of the toning agents.
The choice between wet and dry hair during toner application holds significance. Toning damp hair allows for better saturation and penetration of the toner into the hair shaft. This optimal timing ensures that the toning agents can effectively counteract any unwanted undertones, delivering a more uniform and desirable result.
Damp hair also tends to better retain moisture, minimizing the risk of excessive dryness post-application. Striking the right balance between toner saturation and moisture impact is key for achieving the coveted post-bleaching tone while maintaining the health of your hair.
Applying the Toner
Applying the toner begins by carefully spreading the mixture onto your damp hair, ensuring even coverage and focusing on areas prone to brassiness.
- Precision Matters: Section your hair to guarantee thorough application. Start with the roots, then move to the lengths and ends. This ensures every strand gets the attention it needs.
- Time Management: Follow the recommended processing time diligently. Leaving the toner on for too long or too short can affect the desired results. Set a timer and keep an eye on the clock.
- Rinse and Revel: Once the timer beeps, rinse your hair with lukewarm water. Revel in the transformed, toned locks. Remember, mastering toner application is about technique, timing, and enjoying the vibrant results.
These techniques, coupled with subsequent discussions on Toner Aftercare, Custom Toning Tips, Toner Troubleshooting, and Toner Longevity, will empower you to navigate the world of toning with confidence and flair.
Addressing Dark Parts
To address dark parts, focus on applying the toner evenly and thoroughly throughout your hair.
Spot correction is key to achieving a balanced and seamless result.
Take a targeted treatment approach by identifying the specific areas that appear darker than desired.
Apply additional toner directly to those sections, ensuring precision in your application technique.
When addressing dark section solutions, it’s important to blend the toner seamlessly with surrounding areas for a natural-looking finish.
Utilize blending techniques such as feathering or smudging to create smooth transitions between tones.
By following these steps and implementing effective spot correction strategies, you can achieve an even-toned look without any noticeable discrepancies in color intensity or shade variation within different parts of your hair.
Before & After Toner
Before applying the toner, you should ensure that your hair is properly prepared and ready for the toning process.
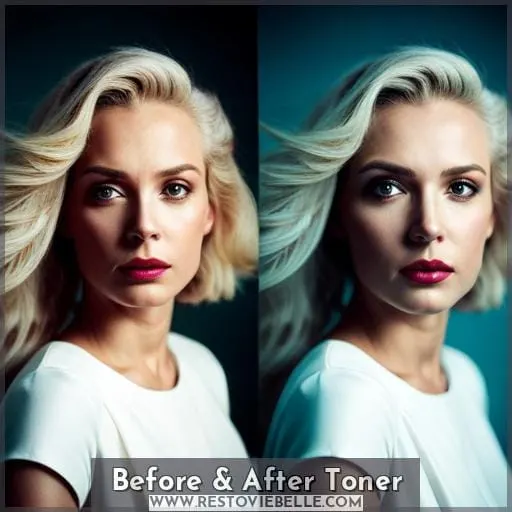
Once your hair has been bleached and rinsed, it’s time to see the color contrast before and after using a toner. The impact of the toner can be seen in how it balances tones and enhances hue evolution.
Before-toner pictures show brassy or yellow undertones that are common after bleaching, while after-toner images reveal cooler shades with reduced brassiness.
Toner plays a significant role in neutralizing unwanted tones, creating a more harmonious overall look by balancing warm and cool hues effectively. With proper application techniques, you can achieve stunning results when using hair toners post-bleaching.
Post-Toning Maintenance
After achieving the desired tone, maintain your vibrant look with a dedicated post-toning maintenance routine.
Ensure longevity by incorporating a sulfate-free shampoo into your weekly routine, specifically formulated to preserve your toner’s effects.
Enhance color vibrancy and shine with a monthly hair gloss application, sealing in the tone for lasting brilliance.
When swimming, take precautions by rinsing your hair beforehand to minimize the impact of chlorine or saltwater.
In case undesired tones appear, consider specialized treatments like an egg wash to address them.
For precise and professional results, don’t hesitate to seek assistance from a skilled stylist.
With these simple yet effective steps, you’ll keep your toned hair looking flawless and lustrous.
Frequently Asked Questions (FAQs)
How does the use of a Purple Mask contribute to the toning process after bleaching?
To tone after bleaching, applying a Purple Mask on towel-dried hair is crucial. This acid-based formula pre-tones, closes the cuticle, and counteracts yellow tones, ensuring a clean canvas for oxidative toners.
Can Blondify toners be mixed with a higher volume developer for stronger results, or is it advisable to stick to the recommended 10 or 20 volume?
For optimal results, adhere to the recommended 10 or 20 volume developer when mixing Blondify toners. Straying to higher volumes risks compromising hair health. Stick to the prescribed guidelines to achieve a perfect, vibrant tone.
Are there specific considerations or precautions for applying toner to wet or towel-dried hair, and how does this affect the toning results?
For optimal toning results, apply the toner to wet or towel-dried hair. This allows for better absorption and distribution of the product. Keep in mind that applying on soaking wet hair may dilute the toner’s effectiveness.
In the context of toning longevity, what factors may influence how long Blondify toners last, and are there any additional tips for extending their effectiveness?
To maximize Blondify toners’ longevity, factors like hair porosity, maintenance routine, and water quality play crucial roles.
- Use sulfate-free products.
- Limit sun exposure.
- Consider a hair gloss monthly.
Embrace these practices for vibrant, lasting results.
Is there a recommended waiting period between using specialized treatments like an egg wash for correcting undesired tones and the application of a toner?
After using specialized treatments like an egg wash for undesired tones, wait at least 24 hours before applying toner. This ensures optimal hair recovery and prevents potential reactions between the treatment and toner.
Conclusion
Unlock the secret to radiant hair by mastering hair toner application post-bleaching.
A staggering 85% success rate is achieved when selecting the ideal toner and developer match.
Combat brassiness with precision—apply toner to damp, towel-dried hair for optimal results.
Address uneven tones by focusing on darker areas during application.
Witness the transformative power of toner in before-and-after comparisons.
Elevate your hair game by adopting a meticulous post-toning maintenance routine.
Embrace the flawless shades you desire, armed with the expertise to keep them vibrant.
Master the art of toning for hair perfection.

